Corel Draw Cut the Top Off a Circle
Introduction to PaintShop Pro's Pick Tools
In this introductory tutorial yous'll learn the basics of using PaintShop Pro'southward Selection tools to create regular and irregular shaped selections.
Click on any of the images below to view full-size.
Setting upwardly your Workspace
- Open PaintShop Pro in theEdit workspace.
- If theLayers palette is not already open, go toView >Palettes and click onLayers. You tin can also open theLayers palette past pressingF8 on your keyboard.
- Click on theWindow bill of fare and ensureTabbed Documents has a checkmark beside it.
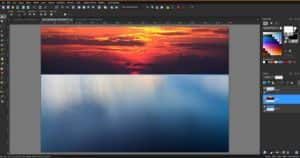
- Open the iii sample images provided: Sunset, Calm Lake and Table salt Flats.
Now permit'due south get our images ready. We are going to demonstrate using the Selection tools to combine different backgrounds and foregrounds of these 3 images, so we need to accept them all in 1 layered image file.
Starting with the Sunset epitome, activate thePan tool (hand icon). Right-click on the dusk image and selectRe-create. At present move to the Calm Lake prototype, right-click on it and selectPaste >Paste as New Layer.
Notation: to re-create and paste, you lot can useEdit >Copy andEdit >Paste as New Layer with any tool activated, or you lot can use keyboard commandsCtrl +C to copy andCtrl +V to paste.
Since the sunset image is much smaller than the lake image, activate thePick tool (arrow icon) and drag out i of the corner handles to increment the size of the sunset image so it is as big as the lake epitome.

Repeat these steps to copy and paste the Salt Flats epitome as a new layer on the lake image.
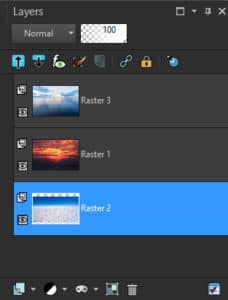
In theLayers palette, right-click on theBackground layer (lake image) and selectPromote Background Layer. You will see that the layer name is nowRaster iii. Click onRaster ane layer (sunset image) and drag information technology belowRaster 3 layer. Do the same withRaster ii layer (common salt flats image). At present the lake image is visible on elevation. This is what yourLayers palette should expect like.
We are going to use these iii photos to demonstrate how you can use theOption tool to select part of i prototype and delete it to reveal part of the image below. Using this technique will allow you to create a composite image using the sky of i photo and the bottom of another photo.
Making a Rectangular Selection
ThePick tools grouping is the third icon on the left-handTools toolbar. Click on the dropdown arrow and you lot will see there are v selection tools that you can choose from. We will offset with the mainPick tool, which is represented past the dotted line rectangle. You tin also activate this tool by pressingS on your keyboard.

Once yous activate the tool, you will see theBelongings bar along the meridian, which has options forOption type,Mode,Plumage, etc. In theProperty bar, apply the post-obit settings:
- Choice type: Rectangle
- Way: Replace
- Feather: 0
- Anti-allonym: checked
- Selection manner: Normal
- Width: ane
- Height: one
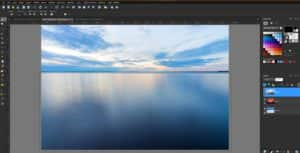
Click on the lake image in theLayers palette to make information technology the active layer. Activate theChoice tool and drag a marquee (dotted line, as well referred to equally "marching ants") to encompass the unabridged lower water area, but just slightly shorter than the horizon. Information technology can be hard with some photos to get your option expanse to line up exactly with an element such every bit a horizon, so in the next pace we'll bear witness yous how to get it perfect.
TIP: You can drag the selection marquee across the side and bottom outer edges of your image and the marquee volition automatically shrink to fit the border of the photograph.
Modifying a Selection
To lucifer upwards our top choice line exactly with the horizon, go toSelections >Modify >Expand.
TIP: for ease of viewing, y'all can make theExpand Choice window larger by grabbing whatever corner and dragging information technology out.
Because our lake prototype is quite large, nosotros will need to adjust theZoom to50 to zoom out. Now drag the image in theBefore orAfter window down until you can meet the top of your pick.
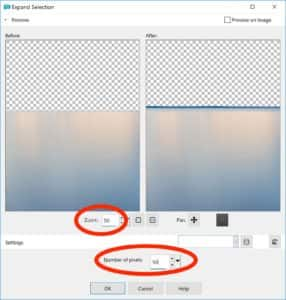
In theNumber of pixels field, apply the arrows or type in a number to aggrandize your selection area until it matches exactly with the horizon line, then clickOK.
Notation: You may notice that the right, lesser and left choice edges have also expanded slight beyond the epitome. That's ok. Since in that location'southward nothing in that location to "select", it won't affect anything going frontwards.
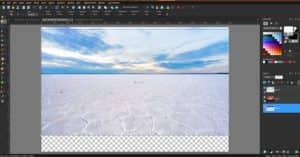
Press theDelete primal on your keyboard. The lake portion of the image volition disappear, and you will run into the sunset image now. In theLayers palette, click on theCentre icon beside the dusk image layer to hide it. Now the salt flats epitome will be visible.
At this bespeak, if you want to create a composite using the bottom of the common salt flats epitome and the sky of the lake paradigm, pressCtrl+D to remove the selection marquee (you lot can as well exercise this by going toSelections >Select None).
Click on the salt flats layer in theLayers palette to make information technology the active layer. Activate thePick tool and use it to reposition the salt flats image to line up with the horizon. At present y'all can ingather and resize your blended image to your liking.
Only permit'due south say you desire to make a different composite using the bottom of the lake image and the sky from the dusk paradigm.
Click theUndo icon (orCtrl +Z) a few times to render to the point where your selection marque appears on the lake epitome, and the lesser portion of the lake has not been deleted.
Click theEye icon beside the sunset paradigm layer in theLayers palette to bear witness the sunset image.
Click on the lake image layer in theLayers palette to make this the active layer.
Your selection marquee should still be visible; click onSelections >Invert. Now the selection marquee is around the sky of the lake image. PressDelete to remove information technology.
PrintingCtrl +D to get rid of the selection marquee. Activate the dusk layer so activate thePick tool. As before, yous can now reposition the dusk epitome so that the horizon is lined upward with the lake paradigm.
The lighting departure is rather harsh between the two images, just y'all become the thought. Y'all tin can employ this process to combine different parts of multiple images to create some really unique composites!
Making a Shape Pick
Let'due south return to the original lake image. Yous can practice this by usingUndo (Ctrl +Z) or simply by closing the lake image without saving and reopening information technology.
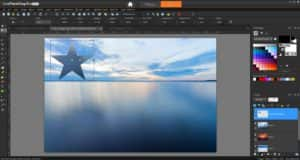
Activate theChoice tool. In theProperty bar, you lot volition see that theSelection type is set toRectangular, as we used in the previous section. Click on the dropdown arrow and select a shape, such asStar 1.
Click and drag the pick marquee to create the star shape wherever you desire on the image.
- If yous want to cut out the selection from your paradigm, press theDelete key.
- If y'all want to move the pick to a unlike expanse on your image, activate thePick tool and use it to drag the selection to where you want it.
- If yous want to employ the option on a dissimilar image, go toEdit >Copy. Open the new image and go toEdit >Paste equally New Layer to paste the selection.
Making Irregular Selections
Close the three sample images we have been working with and open theBlocks sample paradigm.
Hither we have a shape that'south not rectangular, nor does it fall into any of the shapes in the drop-down listing we simply used. At that place are ii means we can tackle this. The first is using thePoint-to-Point selection option in theFreehand Selection tool.
- From theSelection tools group, activate theFreehand Option tool, represented by a lasso icon. Information technology'south located directly under the Rectangular Selection tool.
- In theProperty bar set theSelection type toPoint to point.

Beginning at the corner of any of the blocks. Click once to start the selection, movement your cursor to the adjacent corner and click over again. This creates the first line of your selection surface area. Continue to motion the cursor to each corner and click, creating a serial of straight lines effectually the blocks. As you are creating the concluding line that will join upwards with the starting signal, double-click and this will create the choice area.

NOTE: If yous make a error part style through, just press theEsc key. If yous take already completed your pick, pressCtrl +D to remove the choice marquee and showtime over.
Once your selection is complete:
- If you desire to cutting out the selection from your image, press theDelete key.
- If y'all want to move the option to a different area on your image, activate theOption tool and utilize it to elevate the selection to where y'all want information technology.
- If you desire to use the selection on a different image, re-create and paste it as a new layer.
- If you lot desire to remove the groundwork only keep the object or expanse you selected, become toSelections >Invert and and so press theDelete key.
Using the Automobile Selection Tool
TheCar Selection tool can be a quicker alterative to using theBespeak to Point method. Information technology will create a rectangular selection area that automatically snaps to the edges information technology detects.
- PressCtrl +D to remove the point to betoken option yous just made.
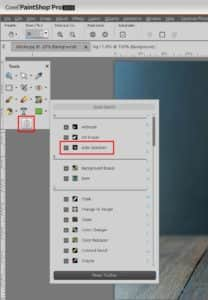
- Select theCar Selection tool, represented past the dotted line rectangle with an pointer within information technology.
NOTE: if you are working in theEssentials workspace in PaintShop Pro, yourTools toolbar may not include theAuto Choice tool. To ready this, click on the plus sign at the bottom, choose theCar Selection tool from the list, and information technology will be added to the toolbar.
Drag the selection marquee to make a tight selection around the stack of blocks. Yous will see that the marquee snaps into identify to automatically create the selection.

Y'all can now use this as with the other types of selections nosotros covered: delete it, move it, copy and paste to a new image, or capsize the selection to delete the background.
When working with selected objects or areas that closely match the background, you may discover some extra $.25 added to your auto selection area. One time y'all have moved or copied and pasted your option, y'all can use theEraser tool or one of thePick tools to get rid of any unwanted areas.

Source: https://learn.corel.com/tutorials/introduction-to-selection-tools/
0 Response to "Corel Draw Cut the Top Off a Circle"
Post a Comment